

Roof Flashing Failures in Michigan: What Goes Wrong & Why
By:
NEXT Exteriors
Published:
February 19, 2026
Reading Time:
12 minutes

Here's something most Michigan homeowners don't realize until water starts dripping through their ceiling: the majority of roof leaks aren't caused by bad shingles. They're caused by failed flashing.
After 35 years installing roofs across Southeast Michigan—from brick Colonials in Grosse Pointe Farms to ranch homes in Sterling Heights—we've seen the same flashing failures over and over. And here's the frustrating part: most of them were preventable. They happen because someone took a shortcut, used the wrong material, or simply didn't understand how Michigan's freeze-thaw cycles punish sloppy work.
In this article, we're pulling back the curtain on the three most common flashing failure points: chimneys, valleys, and wall intersections. We'll show you what proper installation looks like, why these areas fail, and what to watch for on your own roof. This is the kind of information most Detroit roofing services won't take the time to explain—but you deserve to know what's happening above your head.
What Roof Flashing Actually Does
Let's start with the basics. Roof flashing is thin metal installed at vulnerable points on your roof to direct water away from seams and penetrations. Think of it as the waterproofing detail work that happens where shingles can't do the job alone.
Flashing is typically made from one of three materials:
Aluminum: Lightweight, rust-resistant, and affordable. The most common choice for residential roofing in Michigan.
Galvanized steel: Stronger and more durable than aluminum, but heavier and prone to rust if the coating wears through.
Copper: The premium option. Expensive upfront, but it lasts 50+ years and develops a distinctive green patina. Often used on historic homes or high-end projects.
Here's the critical point: flashing is more important than your shingles. A roof with mediocre shingles and excellent flashing will outlast a roof with premium shingles and sloppy flashing every single time. Water doesn't care about your shingle warranty—it finds the path of least resistance, and that path is almost always through failed flashing.
Why This Matters: When you're getting estimates for a roof replacement, ask the contractor to walk you through their flashing plan. If they gloss over it or say "we'll just reuse what's there," that's a red flag. Proper flashing installation takes time, skill, and attention to detail—and it's worth every penny.
Chimney Flashing: The Most Common Failure Point
If there's one place where we see roof leaks year after year, it's around chimneys. And it's not because chimneys are inherently problematic—it's because chimney flashing is the most complicated flashing detail on a residential roof, and a lot of roofers don't do it right.

How Chimney Flashing Should Work
Proper chimney flashing involves two layers working together:
Step flashing: Individual L-shaped pieces of metal that are woven into the shingle courses as they run up the sides of the chimney. Each piece overlaps the one below it, creating a shingled effect that directs water down and away from the chimney.
Counter flashing: A second layer of metal that's embedded into the chimney mortar joints and hangs down over the step flashing. This protects the top edge of the step flashing from water infiltration and creates a finished, professional look.
On the uphill side of the chimney (the side facing the roof peak), you also need a cricket or saddle—a small peaked structure that diverts water around the chimney instead of letting it pool behind it. Without a cricket, debris accumulates, ice builds up, and water eventually finds a way in.
Why Chimney Flashing Fails
The most common mistake? Using caulk or roofing cement as a substitute for proper flashing. We see this constantly: a roofer skips the step flashing, slaps some tar around the base of the chimney, and calls it a day. It might hold for a year or two, but Michigan's freeze-thaw cycles will crack that sealant wide open. Once water gets behind it, you've got a leak—and often, you've got rot in the roof decking that won't be visible until the next roof replacement.
Another failure point: counter flashing that's not properly embedded in the mortar joints. Some roofers will surface-mount the counter flashing with caulk instead of cutting a reglet (a groove) into the mortar and sealing it correctly. This shortcut fails fast, especially when ice dams put pressure on the flashing during Michigan winters.
What to Watch For: If you can see caulk or tar around the base of your chimney, or if the metal flashing looks like it's pulling away from the brick, you've got a problem. Don't wait for a leak—get it inspected by a licensed contractor who understands proper flashing technique.
Valley Flashing: Where Two Roof Planes Meet
Roof valleys—the V-shaped channels where two roof planes intersect—are the superhighways of your roof's drainage system. All the water from both roof sections funnels into the valley, which means this area sees more water flow than anywhere else on your roof. It's also where snow and ice accumulate in winter, creating concentrated pressure points.
There are two main types of valley installations:
Open valleys: Metal flashing (usually aluminum or galvanized steel) is installed in the valley, and the shingles are cut to expose the metal. This is the superior method for Michigan homes because it allows water and ice to flow freely without obstruction.
Closed valleys (woven or cut): Shingles from both roof planes are woven together or cut to overlap in the valley, with no visible metal. This method is cheaper and faster, but it's more prone to failure in climates with heavy snow load and ice damming.
Why Valley Flashing Fails
The biggest culprit: inadequate underlayment. Michigan building code and manufacturer specifications (CertainTeed, GAF, Owens Corning) all require Ice & Water Shield—a self-adhering rubberized membrane—to be installed in valleys before the metal flashing or shingles go down. This creates a waterproof barrier that protects the roof deck even if the primary flashing fails.
But here's what we see on tear-offs all the time: valleys with nothing but standard felt paper underneath, or worse, no underlayment at all. When the shingles or metal flashing develop a leak (and they will, eventually), water goes straight through to the decking. By the time you notice a ceiling stain, you've often got significant rot that requires deck replacement—an expense that could have been avoided with proper underlayment.
Another common failure: debris accumulation. Valleys naturally collect leaves, pine needles, and dirt. If they're not kept clear, water backs up behind the debris dam, and the freeze-thaw cycle does the rest. This is especially true on homes with overhanging trees—a situation we see frequently in Oakland County neighborhoods like Bloomfield Hills and Rochester Hills.

The Ice Dam Factor
Ice dams—those thick ridges of ice that form at roof edges in winter—put enormous pressure on valley flashing. When an ice dam blocks the normal drainage path, water backs up under the shingles and flashing. If your valley doesn't have proper Ice & Water Shield protection, that backed-up water will find its way into your home.
This is where top-rated insulation contractor services intersect with roofing. Ice dams are primarily caused by heat loss through your attic, which melts snow on the upper roof. That meltwater runs down and refreezes at the cold eaves, creating the dam. Proper attic insulation and ventilation eliminate the heat loss that causes ice dams in the first place—which means less stress on your valley flashing.
Wall Intersections: Dormers, Additions, and Kick-Outs
Anywhere your roof meets a vertical wall—dormers, second-story additions, shed roof extensions—you need flashing. And just like with chimneys, this flashing has to integrate properly with both the roofing material and the siding.
Step Flashing at Walls
The correct method is similar to chimney flashing: individual L-shaped pieces of step flashing are woven into the shingle courses as they run up the wall. The vertical leg of the flashing extends up behind the siding (or brick veneer), creating a water-shedding overlap.
When we install house siding in Detroit, we pay close attention to how the siding integrates with existing roof flashing. If the flashing isn't tall enough, or if the siding installer doesn't leave proper clearance, water can wick up behind the siding and cause rot. This is especially common with fiber cement siding (like James Hardie), which requires a minimum 2-inch clearance above roof surfaces.
The Critical Kick-Out Flashing
Here's a flashing detail that most roofers skip, and it costs homeowners thousands in water damage: the kick-out flashing at the bottom of a roof-to-wall intersection.
Picture this: you've got a two-story home with a first-floor addition. The main roof slopes down and meets the side wall of the addition. Without a kick-out flashing, water running down that roof-wall intersection will pour straight down the wall, soaking the siding and eventually rotting the sheathing and framing behind it.
A kick-out flashing is a small L-shaped piece of metal installed at the bottom of the step flashing run. It "kicks" the water out away from the wall and into the gutter system. It's a simple detail that takes about five minutes to install—but we've seen homes with $10,000+ in siding and framing damage because it was omitted.
Real Talk: If you're getting a roof replacement and your home has roof-to-wall intersections, ask your contractor specifically about kick-out flashing. If they don't know what you're talking about, find a different contractor. This is basic building science, and it's required by code.
Why Caulk Is Not a Flashing Solution
We need to address this head-on because it's so common: caulk is not flashing. It's a temporary seal that will fail—guaranteed—within a few years of Michigan weather exposure.
Caulk and sealants have their place in roofing (sealing nail heads, finishing trim details), but they should never be used as the primary water barrier at a roof-wall intersection. UV exposure breaks down the polymers, freeze-thaw cycles crack the seal, and thermal expansion pulls the caulk away from the substrate. When it fails, water gets in.
Proper step flashing, on the other hand, is a mechanical barrier. It doesn't rely on adhesion or sealants—it relies on overlapping metal layers that physically direct water away from vulnerable areas. That's why it lasts decades while caulk lasts months.
Why Flashing Fails in Southeast Michigan
Michigan's climate is uniquely hard on roofing systems. We get the freeze-thaw cycle punishment of the upper Midwest, the humidity and storms of the Great Lakes region, and the occasional ice storm that would make a Canadian wince. Flashing that works fine in Arizona will fail catastrophically here.
Freeze-Thaw Cycles
Southeast Michigan typically sees 50-60 freeze-thaw cycles per winter. Water gets into small gaps in the flashing, freezes (expanding by about 9%), and forces the gap wider. The next thaw allows more water in, which freezes again, widening the gap further. This cycle repeats dozens of times each winter, and it's why sloppy flashing work fails so quickly here.
Properly installed flashing accounts for this. Overlaps are generous (minimum 3 inches for step flashing, 4 inches for valley metal), fasteners are placed strategically to allow for thermal movement, and sealants (when used) are high-quality polyurethane or butyl products that remain flexible at low temperatures.
Ice Dam Pressure
When an ice dam forms, it's not just blocking water—it's creating a reservoir of standing water on your roof, often several inches deep. That water is under pressure, looking for any gap or seam to exploit. Flashing that's merely "good enough" won't hold up. You need flashing that's installed to manufacturer specifications, with proper underlayment backup, to handle ice dam conditions.
This is one reason why NEXT Exteriors' exterior services in Detroit include a comprehensive approach to roofing: we don't just replace shingles and flashing, we evaluate your attic insulation and ventilation to prevent the heat loss that causes ice dams in the first place.
UV Degradation of Sealants
Michigan summers might not be as intense as the Southwest, but we still get plenty of UV exposure—especially on south- and west-facing roof sections. UV radiation breaks down the polymers in roofing sealants, causing them to become brittle and crack. This is why relying on caulk for flashing is such a bad idea: even high-quality polyurethane sealants have a service life of 5-10 years in direct sun exposure.
Thermal Movement of Dissimilar Materials
Your roof is made of materials that expand and contract at different rates: asphalt shingles, metal flashing, wood decking, brick or vinyl siding. When temperatures swing from -10°F in January to 95°F in July (a 105-degree range), those materials are moving—sometimes by fractions of an inch, but that's enough to stress poorly installed flashing.
Proper flashing installation accounts for this movement. Fasteners aren't over-driven. Overlaps are generous enough to accommodate shifting. Sealants (when necessary) are applied in a way that allows for movement without tearing. It's the difference between a flashing system that lasts 30 years and one that fails in 5.
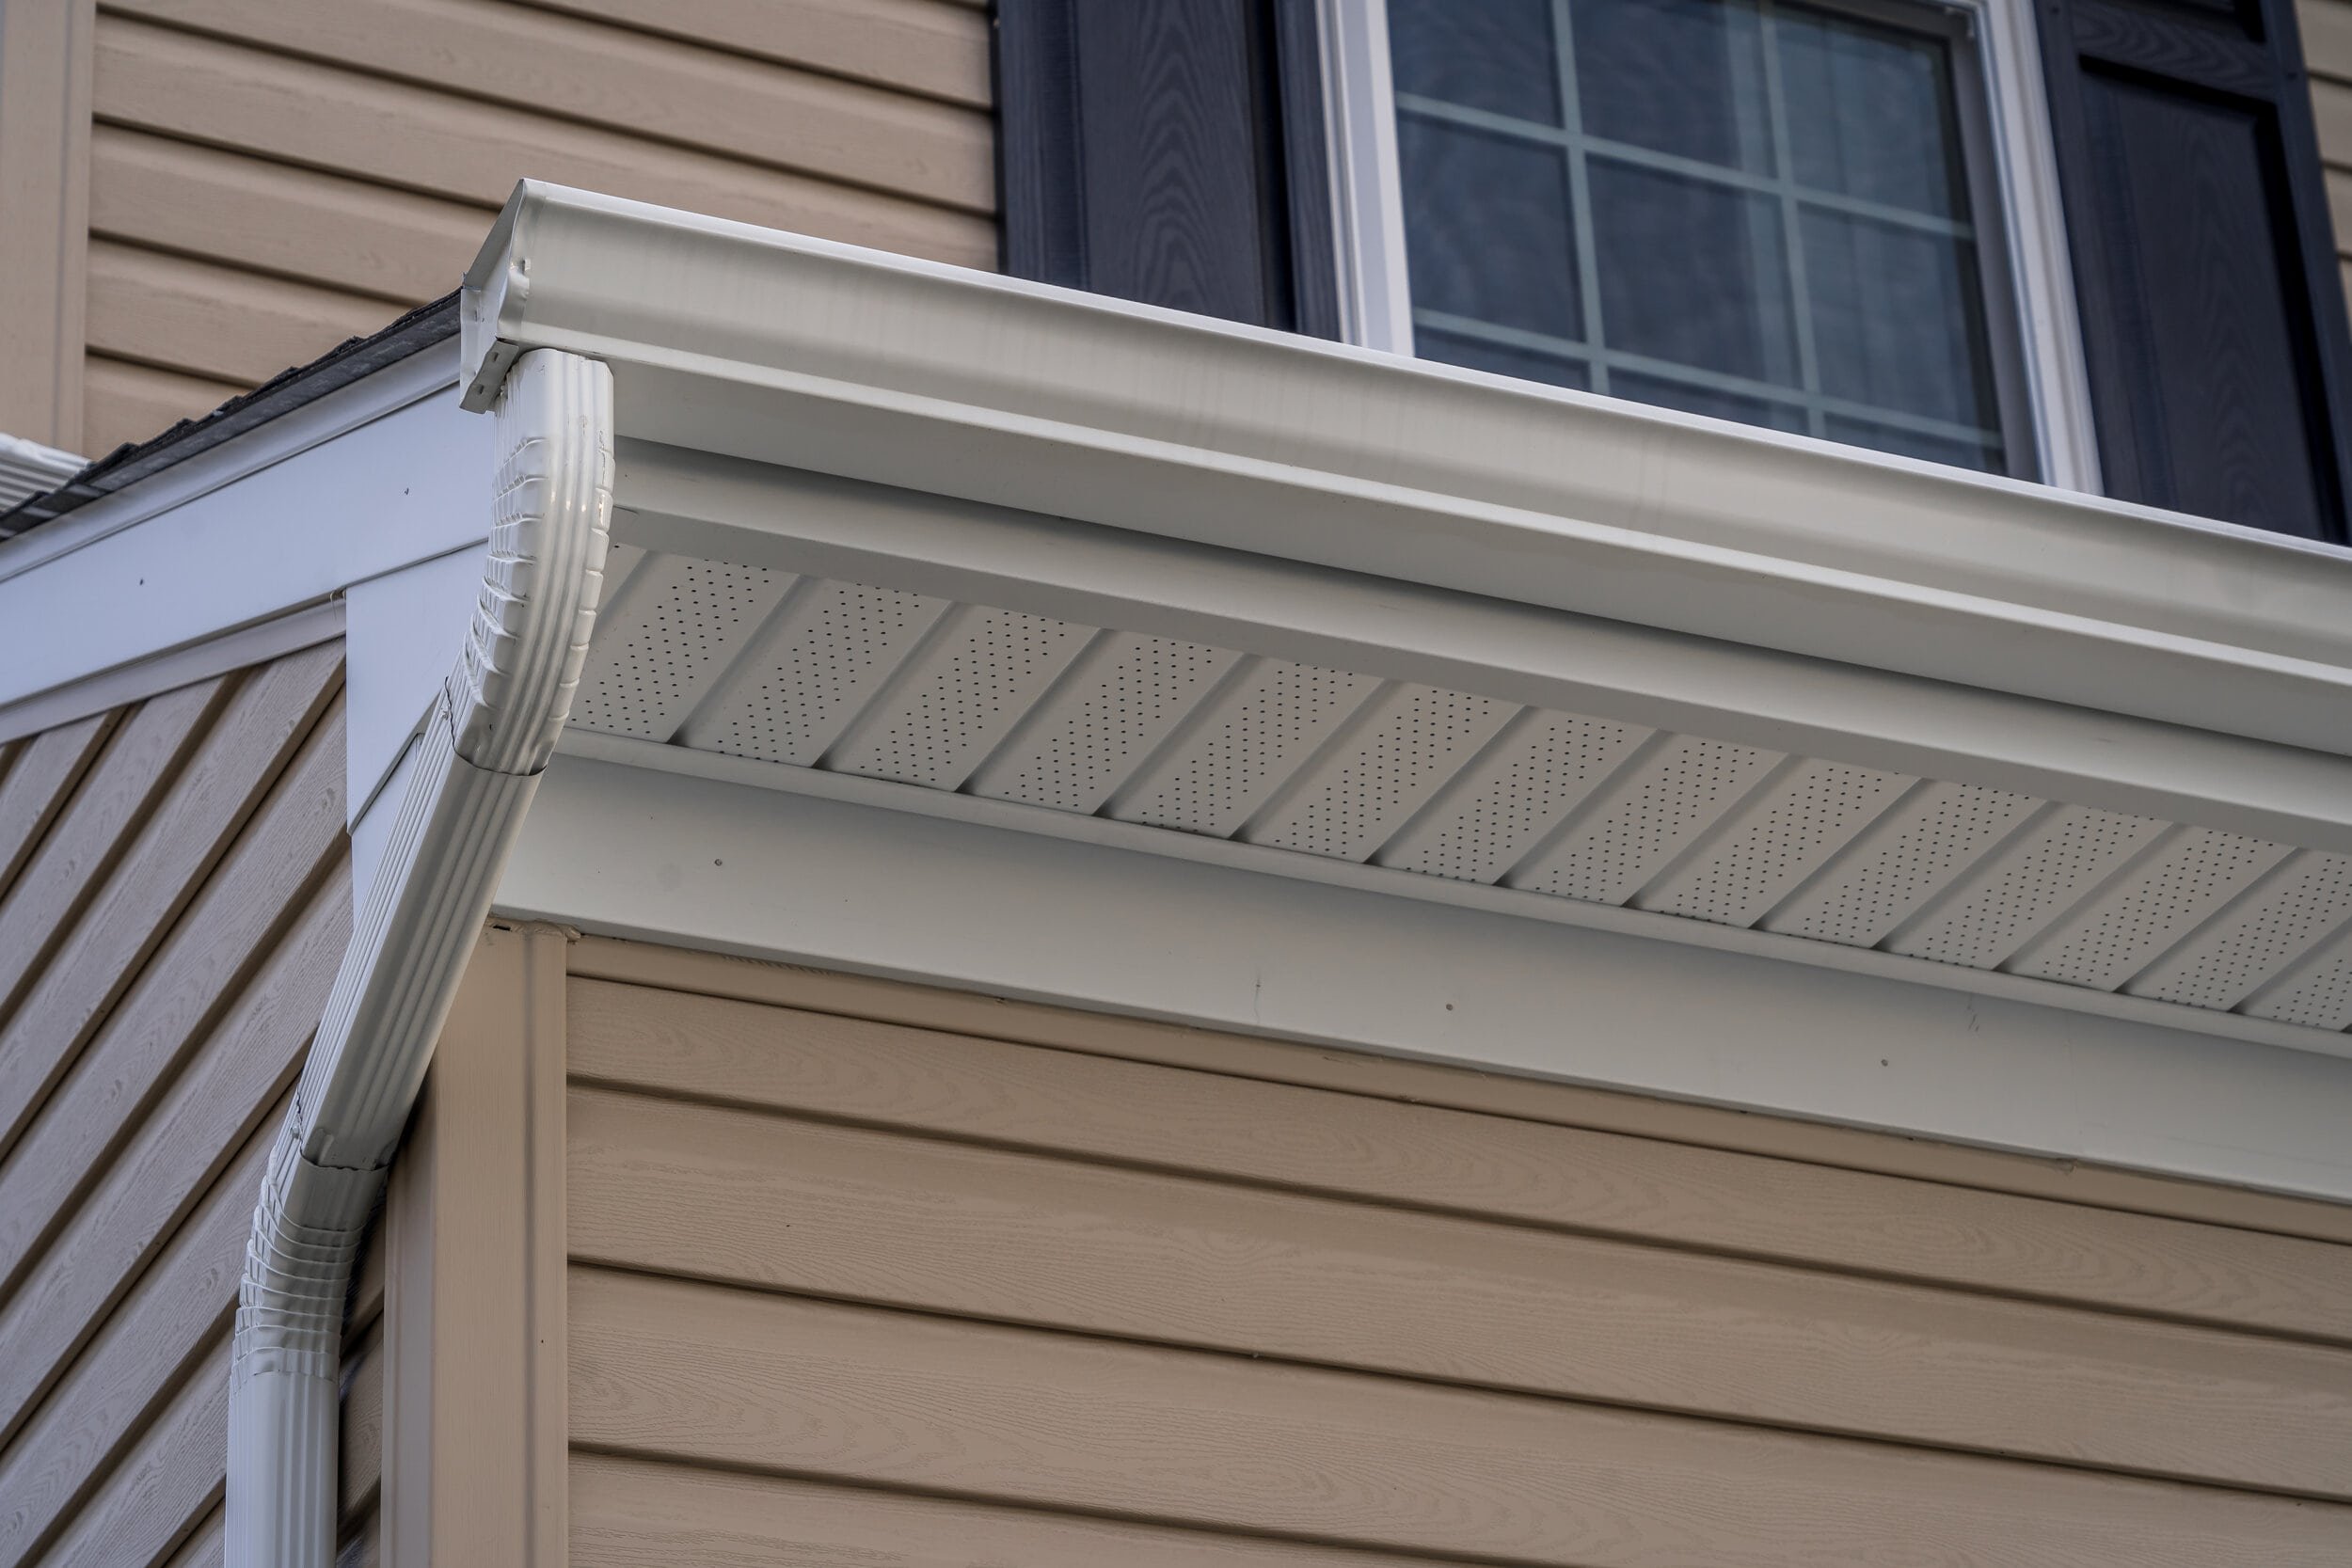
What Proper Flashing Installation Looks Like
So what does "done right" actually look like? Here's what we do on every roof replacement in Metro Detroit, following CertainTeed Master Shingle Applicator standards and Michigan building code:
Ice & Water Shield in All Valleys and Eaves
Before any flashing or shingles go down, we install Ice & Water Shield—a self-adhering rubberized membrane—in all valleys, at all eaves (minimum 36 inches up from the edge), and around all penetrations (chimneys, vent pipes, skylights). This creates a waterproof backup layer that protects the deck even if the primary roofing fails.
In areas prone to ice damming (which, in Michigan, is basically everywhere), we extend the Ice & Water Shield coverage to at least 24 inches past the interior wall line. This ensures that even if an ice dam forces water up under the shingles, it can't reach the living space below.
Step Flashing at Chimneys and Walls
Every chimney and roof-wall intersection gets individual step flashing pieces, minimum 8 inches long, with at least 3 inches of overlap between pieces. The flashing is woven into the shingle courses—not installed on top of them—so water flows over the flashing, not under it.
At chimneys, we cut reglets into the mortar joints and embed the counter flashing properly, sealing with high-quality polyurethane. We don't surface-mount with caulk. We don't skip the cricket on the uphill side. We do it right, because we know what happens when it's done wrong.
Kick-Out Flashing at Every Roof-Wall Termination
At the bottom of every roof-wall intersection, we install a kick-out flashing that directs water away from the wall and into the gutter system. This is a non-negotiable detail that prevents thousands in siding and framing damage.
Quality Control Checkpoints
Before we install shingles over any flashing, our crew chief inspects the work. We're looking for:
Proper overlap on all flashing pieces
Correct fastener placement (not too close to edges, not over-driven)
Ice & Water Shield fully adhered with no bubbles or wrinkles
Counter flashing properly embedded and sealed
Kick-out flashing in place at all terminations
This level of attention to detail is what separates a 10-year roof from a 30-year roof. It's also why we've maintained an A+ BBB rating since 2006 and a 5.0-star average across 87+ reviews—our customers don't have to call us back for leak repairs, because we do it right the first time.
Signs You Have a Flashing Problem
How do you know if your roof has flashing issues? Here are the warning signs we tell homeowners in Macomb County, Oakland County, and St. Clair County to watch for:
Interior Water Stains
Water stains on ceilings or walls near chimneys, dormers, or exterior walls are the most obvious sign. But here's the tricky part: the stain might not appear directly below the leak. Water can travel along rafters or sheathing for several feet before it drips through the ceiling. If you see staining, get your attic inspected—the leak source is often several feet away from where the water shows up inside.
Rust Stains on Siding
If you see rust streaks running down your siding below a roof line, that's water carrying oxidized metal from failed flashing. This is especially common below kick-out flashing locations (or where kick-out flashing should have been installed but wasn't).
Visible Flashing Separation
From the ground (or from a ladder if you're comfortable), look at your chimney flashing and roof-wall intersections. If you can see gaps between the flashing and the chimney or wall, or if the flashing appears to be pulling away, you've got a problem. Don't wait for a leak—get it repaired before water damage starts.
Recurring Leaks in the Same Location
If you've had the same leak "fixed" multiple times, the problem is almost certainly failed flashing that's being patched with caulk instead of being properly replaced. This is frustratingly common: a homeowner calls a handyman or a low-bid roofer, they slap some tar on the problem area, and the leak comes back the next spring. Proper flashing repair requires removing shingles, installing new flashing correctly, and reinstalling the shingles—it's more work than a caulk job, but it actually solves the problem.
Damp or Moldy Attic Insulation
If you're up in your attic and you notice damp insulation, water stains on the rafters, or a musty smell, you've got water intrusion—and flashing failure is the likely culprit. This is especially common near chimneys and along roof-wall intersections.
What to Do: If you spot any of these warning signs, don't panic—but don't ignore them either. Water damage gets exponentially worse the longer it goes unaddressed. Contact a licensed roofing contractor (like NEXT Exteriors) for an inspection. We'll identify the source of the leak, explain what needs to be repaired, and give you an honest assessment of whether you need a targeted repair or a full replacement.
Cost Reality: Flashing Repairs vs. Full Replacement
Let's talk numbers, because Michigan homeowners are practical people who want to know what they're looking at financially.
Isolated Flashing Repairs
If you catch a flashing problem early—say, you notice your chimney flashing starting to separate, but there's no interior damage yet—a targeted repair is usually in the $500-$1,500 range, depending on the complexity of the work. This typically involves:
Removing the shingles around the problem area
Installing new step flashing and counter flashing
Replacing Ice & Water Shield if necessary
Reinstalling shingles (we'll match your existing shingles as closely as possible)
For a simple kick-out flashing addition (which should have been done during the original roof installation), you're looking at $200-$400—a small investment that prevents thousands in future siding and framing repairs.
When Full Roof Replacement Makes More Sense
If your roof is 15+ years old and you're dealing with multiple flashing failures, it often makes more financial sense to replace the entire roof rather than chase leaks with piecemeal repairs. Here's why:
You're paying twice for labor: Removing shingles to access flashing, then reinstalling them, is almost as much labor as a full tear-off and replacement. If you're going to pay for that work, you might as well get a new roof out of it.
Old shingles are brittle: When we remove 15-year-old shingles to repair flashing, they often break. Replacing them with new shingles creates a patchwork that's visible from the street and doesn't match the weathered appearance of the rest of the roof.
You're addressing the whole system: A full replacement lets us install Ice & Water Shield everywhere it's needed, upgrade to better underlayment, and ensure all flashing is done to current code and manufacturer specs. You get a 25-30 year warranty instead of a band-aid repair.
For a typical Southeast Michigan home (1,800-2,200 square feet, standard architectural shingles), a full roof replacement with proper flashing runs $8,000-$14,000, depending on roof complexity, material choices, and whether deck repairs are needed. Yes, that's more than a $1,000 flashing repair—but if your roof is due for replacement anyway, it's the smarter long-term investment.
Insurance Considerations
If your flashing failure is due to storm damage (wind-lifted shingles that exposed flashing to the elements, hail damage to metal flashing), your homeowner's insurance may cover the repair or replacement. We work with insurance adjusters regularly and can help you document the damage and file a claim.
One note: insurance typically covers sudden damage, not gradual deterioration. If your chimney flashing failed because it was installed incorrectly 10 years ago, that's not covered. But if a windstorm tore off shingles and damaged the flashing, you've got a claim.
The Cost of Doing Nothing
Here's the reality: ignoring a flashing leak costs more than fixing it. Water damage compounds quickly. What starts as a $800 flashing repair can turn into a $5,000 project once you factor in:
Roof decking replacement (rotted OSB or plywood)
Rafter or truss repairs
Attic insulation replacement (wet insulation has to be removed)
Interior drywall and paint repairs
Mold remediation if the leak has been ongoing
We've seen homeowners in Warren and Troy put off chimney flashing repairs for "just one more winter," only to discover $8,000 in structural damage when they finally called us. Don't be that homeowner. Address flashing problems when they're small and manageable.
Related Services from NEXT Exteriors
While proper flashing is critical for roof performance, it's just one piece of your home's exterior system. At NEXT Exteriors, we take a comprehensive approach to protecting Michigan homes. Our Detroit window experts can help you upgrade to energy-efficient windows that reduce heat loss and prevent ice dam formation. Our seamless gutters in Detroit, MI work hand-in-hand with proper roof flashing to direct water safely away from your foundation. And when it's time to refresh your home's appearance, our Southeast Michigan painting professionals use Sherwin-Williams products exclusively for long-lasting, beautiful results.
Every service we offer is backed by the same old-school values: honest work, fair pricing, no gimmicks. We show up on time, we do the job right, and we don't try to sell you things you don't need. That's how we've stayed in business since 1988, and it's how we've earned a 5.0-star rating across 87+ reviews.
Ready to Get Started?
NEXT Exteriors has been protecting Michigan homes since 1988. Whether you need a flashing repair, a full roof replacement, or a comprehensive exterior upgrade, we'll give you an honest assessment and a fair price. No pushy sales tactics. No unnecessary upgrades. Just straight talk from a team that's been doing this work for 35 years.
Or call us: (844) 770-6398
Frequently Asked Questions About Roof Flashing Failures
How long should roof flashing last in Michigan?
Properly installed aluminum or galvanized steel flashing should last 20-30 years in Michigan—roughly the same lifespan as your shingles. Copper flashing can last 50+ years. However, flashing that's installed incorrectly or with inadequate underlayment can fail in as little as 5-10 years, especially in our freeze-thaw climate. The key is proper installation: generous overlaps, correct fastener placement, and Ice & Water Shield backup in vulnerable areas.
Can I repair flashing without replacing my entire roof?
Yes, in many cases. If you catch a flashing problem early and your shingles are still in good condition, we can remove the shingles around the problem area, install new flashing correctly, and reinstall the shingles. This is most common with chimney flashing and isolated wall intersections. However, if your roof is 15+ years old or you're dealing with multiple flashing failures, a full replacement often makes more financial sense—you're paying for much of the same labor either way, and you get a complete warranty with a new roof.
Why does my chimney leak even though I just had it sealed?
If someone "sealed" your chimney with caulk or roofing cement without installing proper step flashing and counter flashing, the seal will fail—usually within 1-2 Michigan winters. Caulk is not a substitute for mechanical flashing. It breaks down under UV exposure, cracks during freeze-thaw cycles, and pulls away from surfaces as materials expand and contract. Proper chimney flashing involves two layers of metal (step flashing and counter flashing) installed according to manufacturer specifications. It's more work than a caulk job, but it actually solves the problem instead of just postponing it.
What is kick-out flashing and why is it important?
Kick-out flashing is a small L-shaped piece of metal installed at the bottom of a roof-wall intersection. It "kicks" water out away from the wall and into the gutter system, preventing water from running down the siding and causing rot. It's a critical detail that many roofers skip, and it's the single most common cause of siding and framing damage we see on homes with additions or dormers. Installing kick-out flashing takes about five minutes and costs $200-$400—a tiny investment that prevents thousands in water damage.
Should I see metal flashing in my roof valleys?
In most cases, yes—especially in Michigan. Open valleys (where you can see the metal flashing) are the superior method for climates with heavy snow and ice. The exposed metal allows water and ice to flow freely without obstruction. Closed valleys (where shingles are woven together with no visible metal) are cheaper and faster to install, but they're more prone to failure under ice dam conditions. If your roof has closed valleys and you're experiencing leaks, converting to open metal valleys during your next replacement is a smart upgrade.
How much does chimney flashing repair cost?
For a typical residential chimney in Southeast Michigan, proper flashing repair (removing surrounding shingles, installing new step flashing and counter flashing, replacing Ice & Water Shield, and reinstalling shingles) runs $800-$1,500. If a cricket or saddle needs to be built on the uphill side of the chimney, add another $400-$800. This might seem expensive compared to a $200 caulk job, but it's a permanent solution that will last 20-30 years instead of failing in 2-3 years. And it prevents the $5,000+ in interior water damage that happens when cheap repairs fail.
Can ice dams cause flashing to fail?
Absolutely. Ice dams create standing water on your roof—sometimes several inches deep—under pressure. That water is looking for any gap or seam to exploit, and it will find weaknesses in poorly installed flashing. This is why proper underlayment (Ice & Water Shield) is so critical in Michigan: it provides a waterproof backup layer that protects your roof deck even when ice dams force water up under the shingles and flashing. The best long-term solution is preventing ice dams in the first place through proper attic insulation and ventilation—something we address on every roof replacement project.