

Contractors Siding Installation Michigan: What to Expect

You've picked out the color. You've signed the contract. The crew is scheduled to arrive next Tuesday. But what actually happens during a professional siding installation in Michigan?
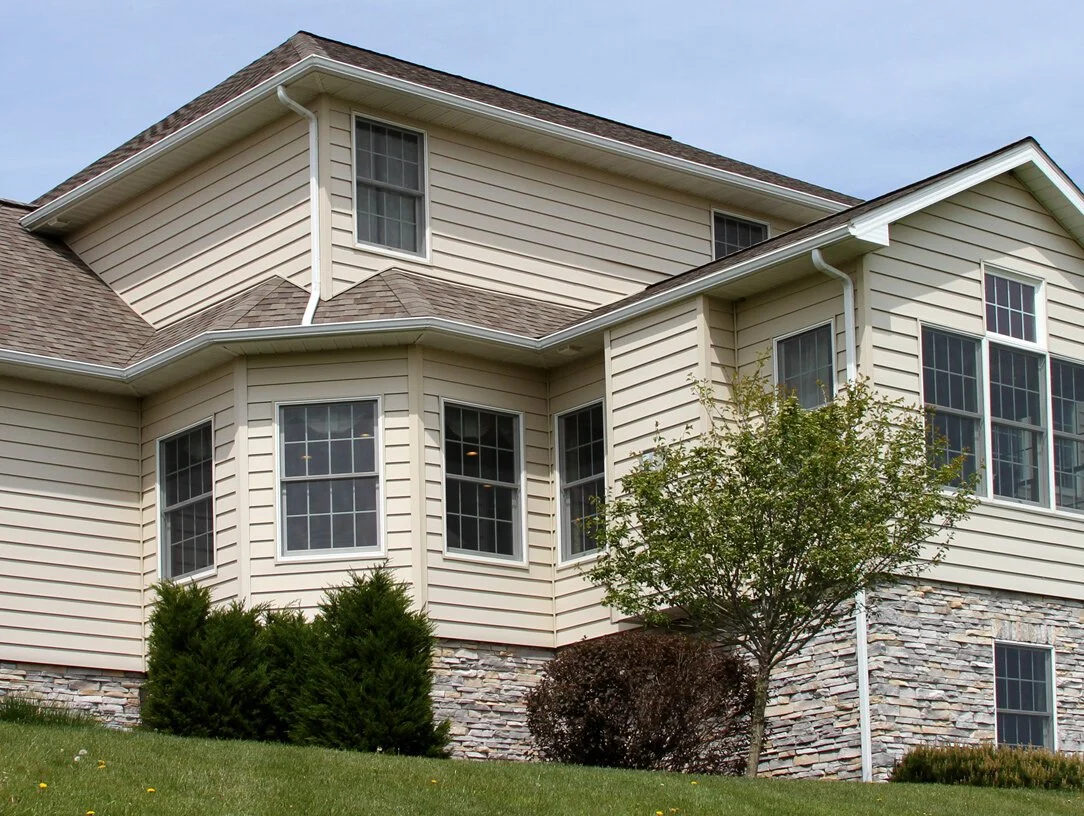
Most homeowners see the finished product — clean lines, fresh color, tight seams. What they don't see is the ten-step process happening behind those panels, the flashing details that prevent ice dam leaks, or the expansion gaps that keep vinyl from buckling during a July heat wave in Sterling Heights.
After 35 years installing house siding in Detroit and across Southeast Michigan, we've learned that the difference between siding that lasts 30 years and siding that fails in five comes down to installation details most homeowners never notice — until something goes wrong.
Here's what actually happens when professional contractors handle a siding installation in Michigan, what separates good work from shortcuts, and what you should be watching for when the crew shows up at your house.
The Pre-Installation Process
Before a single panel goes up, there's work happening that most homeowners never see.
Initial Assessment and Measurements
A proper siding estimate starts with accurate measurements. We're not just measuring wall area — we're accounting for waste factor (typically 10-15% depending on the home's complexity), noting every window, door, soffit, and corner that requires trim.
During this phase, we're also looking at your home's current condition. Is the sheathing solid? Are there signs of water damage around windows? Is the house wrap intact, or are we looking at a full tear-off and re-wrap? These answers determine whether you're getting a straightforward siding replacement or a more involved project that addresses underlying issues.
Material Selection
Michigan homeowners typically choose between three siding materials, each with different installation requirements:
Vinyl siding is the most common choice in Southeast Michigan. It's affordable, low-maintenance, and when installed correctly with proper expansion gaps, it handles our freeze-thaw cycles well. We work with CertainTeed and GAF vinyl products that carry wind ratings appropriate for Michigan weather — typically 110-130 mph.
Fiber cement siding (James Hardie is the industry standard) requires different installation techniques. It's heavier, doesn't expand and contract like vinyl, and needs to be painted or comes pre-finished. The installation is more labor-intensive, which is why fiber cement siding in Metro Detroit costs more upfront — but it also outlasts vinyl in harsh conditions.
Engineered wood siding like LP SmartSide offers the look of real wood with better moisture resistance. It requires careful flashing and proper clearance from grade (at least 6 inches) to prevent moisture wicking.
Each material has manufacturer-specific installation requirements. Cutting corners on these specs voids warranties and leads to premature failure.
Permit Requirements
In most Michigan municipalities, siding replacement requires a building permit. This isn't bureaucratic red tape — it's quality control. The permit process ensures the work meets Michigan building codes and gets inspected.
Professional contractors pull permits as part of the job. If someone tells you "we can skip the permit and save you money," that's a red flag. When we handle exterior services in Detroit, permits are standard practice, not an optional extra.

Preparation and Tear-Off
Installation day starts with protection. Before any old siding comes off, we're laying ground protection, covering landscaping, and setting up debris chutes if needed.
Removing Old Siding
Tear-off is more than just ripping off old panels. We're working carefully around windows and doors to avoid damage. We're watching for hazards — old siding on 1960s Michigan ranch homes sometimes contains asbestos, which requires special handling.
As the old siding comes off, we're inspecting what's underneath. This is when hidden problems reveal themselves: rotted sheathing around a bathroom window that's been leaking for years, missing house wrap, improperly flashed penetrations.
Sheathing Inspection and Repair
Once the old siding is off, we can see the bones of your house. OSB or plywood sheathing should be solid, dry, and structurally sound. Any soft spots, water staining, or rot gets cut out and replaced before we proceed.
This is also when we address any insulation services in Southeast Michigan that make sense — adding rigid foam insulation over sheathing before the house wrap goes on can significantly improve your home's thermal performance.
Weather Barrier Installation
House wrap (or a similar weather-resistant barrier) is your home's primary defense against wind-driven rain and moisture infiltration. Proper installation means:
- Starting at the bottom and working up, overlapping each course by at least 6 inches
- Taping all seams with manufacturer-approved tape (not just any tape)
- Integrating with window and door flashing
- Ensuring the wrap is tight but not stretched
This layer is critical in Michigan, where wind-driven rain during storms can find its way behind siding. We've seen too many siding failures that had nothing to do with the siding itself — the house wrap was installed poorly or skipped entirely.
The Installation Process Step-by-Step
Now we get to the actual siding installation. Here's what happens, in order:
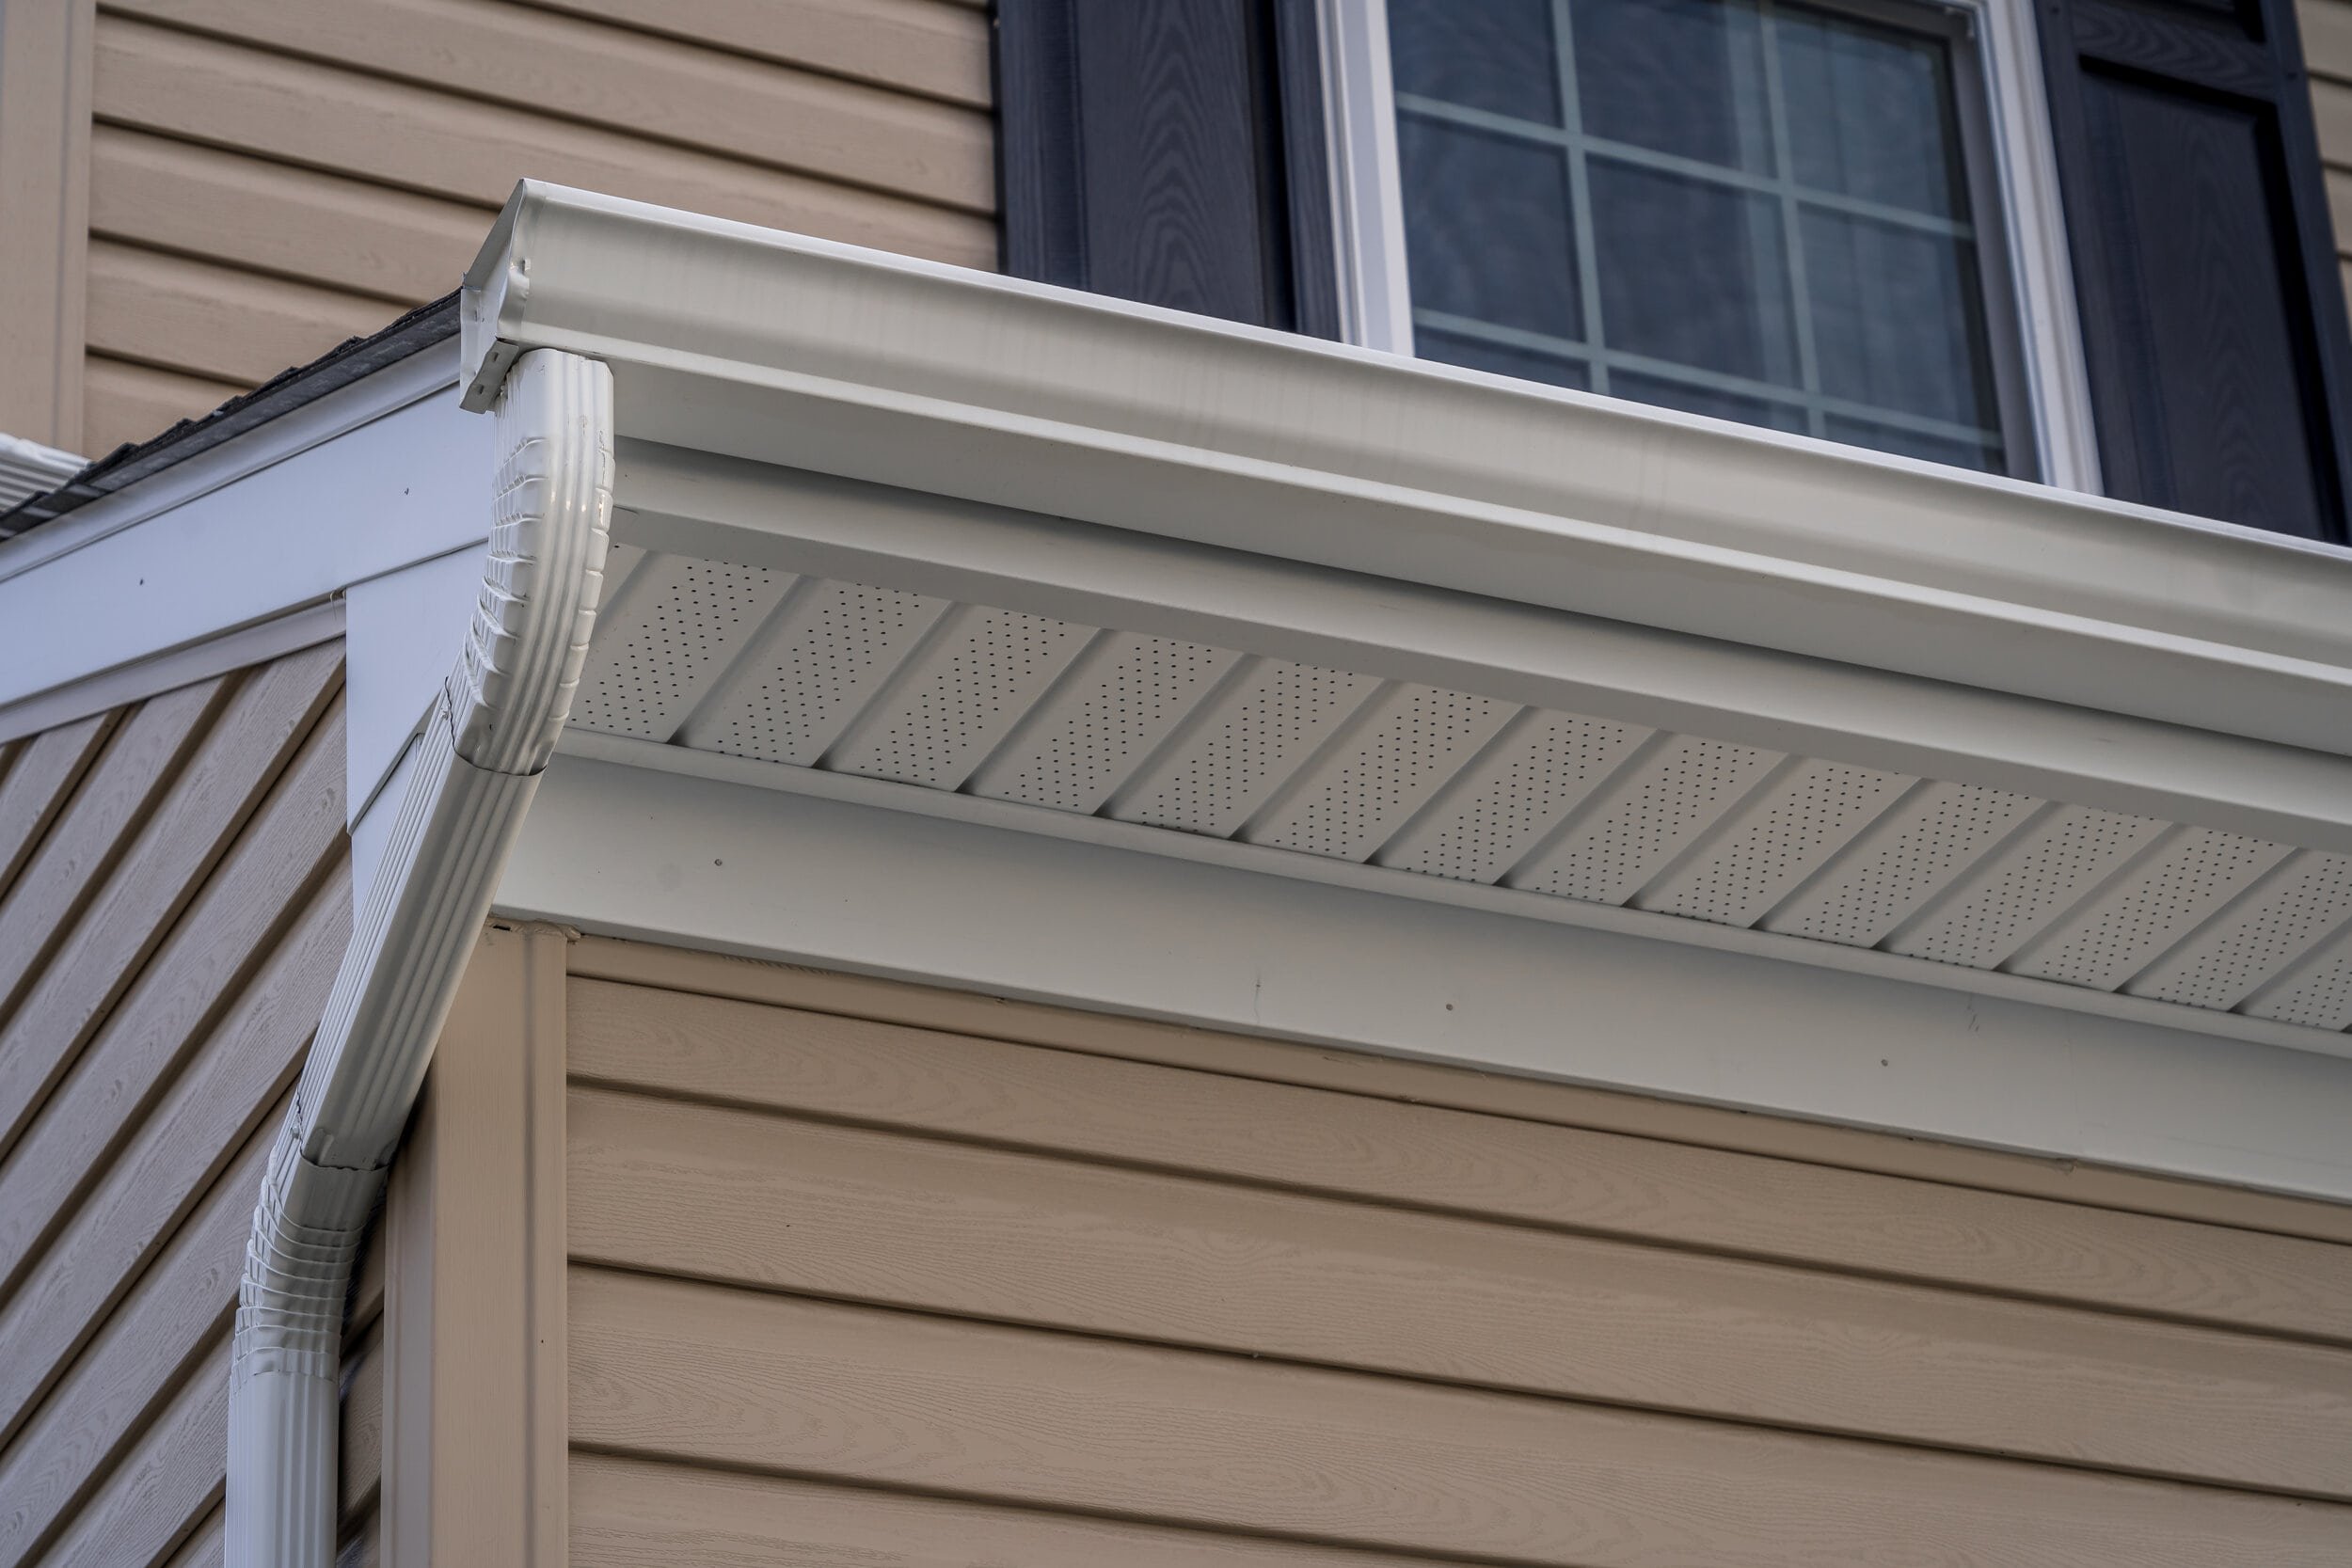
Step 1: Flashing Installation
Before any siding goes up, we flash every opening. Windows and doors get drip edge flashing at the top, sill flashing at the bottom, and proper integration with the house wrap. This creates a drainage plane — water that gets behind the siding has a path to get back out.
Penetrations for vents, exterior lights, and seamless gutters in Detroit, MI all get flashed before siding covers them.
Step 2: Starter Strips and J-Channels
The starter strip at the bottom of the wall provides a locking point for the first row of siding. It needs to be level — if it's not, every row above it will be off.
J-channels go around windows, doors, and at inside corners. These channels create a finished edge and allow for proper drainage. Cutting corners here (literally) leads to water infiltration and aesthetic problems.
Step 3: Corner Posts
Outside corners get corner posts installed first. These need to be plumb and properly fastened. Inside corners get either corner posts or J-channel, depending on the product and aesthetic preference.
Step 4: Panel Installation
This is where most of the visible work happens. Each siding panel locks into the one below it and gets nailed through the nailing hem. Here's where installation technique matters:
Nailing technique: Nails go in the center of the nailing slot, not at the ends. They're driven flush but not tight — the panel needs to be able to move. Overdriven nails (a common shortcut) prevent thermal expansion and lead to buckling.
Expansion gaps: Vinyl siding expands and contracts significantly with temperature changes. In Michigan, where we see 100°F+ temperature swings between summer and winter, this matters. Panels need 1/4-inch gaps at trim and J-channels to allow for movement. Install vinyl tight in July, and it'll buckle. Install it too loose in January, and you'll have gaps in summer.
Overlap: Each panel overlaps the one next to it by about an inch. These overlaps should face away from high-traffic areas and prevailing winds to minimize visibility and water infiltration.
Step 5: Trim and Finishing
Once all panels are up, trim work happens. This includes fascia, soffit, corner trim, and any decorative elements. Proper trim installation requires the same attention to expansion gaps and flashing.
If you're also addressing exterior trim replacement in Metro Detroit, this is when that work integrates with your new siding.
Michigan-Specific Installation Considerations
Installing siding in Michigan isn't the same as installing it in North Carolina or Arizona. Our climate demands specific techniques.
Freeze-Thaw Cycle Preparation
Michigan's freeze-thaw cycles are brutal on exterior materials. Water gets into small gaps, freezes, expands, and widens those gaps. The next thaw brings more water, and the cycle repeats.
Proper siding installation prevents this by ensuring water can't get trapped behind the siding. That means proper flashing, weep holes where needed, and ensuring the drainage plane works as designed.
Ice Dam Prevention
Where your siding meets your roofline matters in Michigan. Ice dams form when heat escaping through your roof melts snow, which then refreezes at the eaves. This can drive water up under siding at the roofline.
Professional installation includes proper flashing at this junction and ensures ice dams in Michigan won't compromise your siding. Often, this means coordinating siding work with Detroit roofing services to address both systems together.
Wind Rating Requirements
Michigan building codes require siding to withstand specific wind loads. In most of Southeast Michigan, that means products rated for 110 mph winds minimum. Storm-prone areas near the lakes may require higher ratings.
This isn't just about the product — it's about installation. Proper nailing patterns and fastener spacing are part of meeting wind load requirements. Cutting corners on fasteners to save time means your siding might not survive the next severe thunderstorm.
Moisture Management in Humid Summers
Michigan summers are humid. That moisture needs somewhere to go. Proper siding installation includes ventilation — soffit vents, ridge vents, and ensuring the wall cavity can breathe.
This is especially important if you're adding top-rated insulation contractor in Detroit services as part of your project. Adding insulation without addressing ventilation can trap moisture and lead to mold and rot.
What Separates Professional Installation from Poor Work
You can't always tell good siding installation from bad by looking at it from the street. The problems show up later — in three years when panels are buckling, in five years when you're seeing water damage inside walls, in ten years when you're replacing siding that should have lasted 30.
Here's what separates professional work from shortcuts:
Common Shortcuts Contractors Take
Skipping the house wrap: "The old siding is the house wrap" is something we've heard from homeowners whose previous contractor cut corners. House wrap is not optional.
Improper nailing: Nailing too tight, nailing at the ends of slots, using too few fasteners, or using the wrong fasteners entirely. All of these save time. All of them cause problems.
Ignoring expansion gaps: Butting panels tight against trim looks cleaner initially but leads to buckling when temperatures rise.
Poor flashing: Skipping flashing or using improper materials around windows and doors. This is the number one cause of water infiltration behind siding.
Not addressing underlying damage: Installing new siding over rotted sheathing or failing to fix moisture problems. The new siding looks great for a year, then the problems start showing.
Red Flags During Installation
If you see any of these while your siding is being installed, stop work and ask questions:
- Crew members driving nails with hammers instead of using a nail gun set to proper depth
- Panels being forced into place or trimmed excessively to fit
- No visible flashing being installed around windows and doors
- Siding being installed in freezing temperatures (most vinyl can't be properly installed below 40°F)
- Crew working in heavy rain (moisture gets trapped behind siding)
- No building permit posted
Quality Checkpoints
Professional installations include quality checks at each phase:
- Sheathing inspection and repair before house wrap goes on
- House wrap inspection for proper overlap and taping
- Flashing inspection before siding covers it
- Level check on starter strips and first row
- Random checks of nailing depth and expansion gaps during installation
- Final walk-through with the homeowner
When you're researching siding contractors near me in Southeast Michigan, ask about these quality control steps. Contractors who have a system for quality checks are contractors who stand behind their work.
Timeline and What to Expect
How long does a siding installation take in Michigan? The honest answer: it depends.
Typical Project Duration
For an average 1,500-2,000 square foot home in Rochester Hills or Troy, a complete siding replacement typically takes 5-7 working days with a crew of 3-4 people. That breaks down roughly as:
- Day 1: Setup, protection, tear-off of old siding
- Day 2: Sheathing inspection and repair, house wrap installation
- Day 3-4: Flashing, trim installation, start panel installation
- Day 5-6: Complete panel installation
- Day 7: Trim work, cleanup, final inspection
Larger homes, complex architectural details, or extensive sheathing repair can extend this timeline. A 3,000 square foot Colonial in Bloomfield Hills with multiple gables and detailed trim work might take 10-12 days.
Weather Delays and Seasonal Considerations
This is Michigan. Weather happens. Rain delays are common, especially in spring and fall. We don't install siding in heavy rain — moisture gets trapped behind the house wrap and siding.
Temperature also matters. Vinyl siding shouldn't be installed when temperatures are below 40°F. The material is too brittle and can crack during cutting and installation. Fiber cement has more temperature flexibility but still has limits.
The best time for siding installation in Southeast Michigan is late spring through early fall — May through October. We work year-round when weather permits, but winter installations require careful temperature monitoring and sometimes take longer due to shorter daylight hours and weather delays.
What Happens at Your House Daily
Here's what you can expect during installation:
Arrival time: Crews typically arrive between 7:30-8:30 AM. We'll let you know the day before when to expect us.
Noise: Siding installation is loud. Nail guns, saws, and general construction noise happen from arrival until 4:30-5:00 PM most days. If you work from home, plan accordingly.
Access: Crews need access to all exterior walls. That means moving patio furniture, grills, and anything else within a few feet of the house. We'll walk through this before starting.
Debris: We contain debris in a dumpster or trailer, but there will be construction activity around your house. We do a thorough cleanup at the end of each day and a final cleanup when the project is complete.
Security: Your home will be weather-tight every night. We don't leave open walls exposed overnight.
Cost Reality: What You're Actually Paying For
Siding installation costs vary widely in Southeast Michigan, and understanding what you're paying for helps explain why.
Labor vs. Materials Breakdown
For a typical vinyl siding project, the cost breakdown is roughly:
- 40-50% labor and installation
- 30-40% materials (siding, trim, fasteners, house wrap, flashing)
- 10-15% overhead and project management
- 5-10% profit margin
Labor is the biggest cost because proper installation is labor-intensive. Flashing every window correctly takes time. Installing house wrap with proper overlap and taping takes time. Setting up and breaking down scaffolding safely takes time.
When you see quotes that are significantly lower than others, the savings are usually coming from labor — which means shortcuts in installation quality. For detailed pricing information, see our guide on siding cost in Metro Detroit.
Why the Cheapest Bid Usually Costs More
We've replaced a lot of siding that was installed poorly by the low bidder. Here's what happens:
The low-bid contractor cuts corners on installation. The siding looks fine for a year or two. Then problems start: panels buckling, water damage appearing inside walls, trim pulling away from the house.
Now you're paying twice — once for the cheap installation, and again to fix it properly. Often, that means complete tear-off and reinstallation because the underlying damage is too extensive to patch.
Professional installation costs more upfront because it includes:
- Proper surface preparation and repair
- Quality materials from manufacturers like CertainTeed, James Hardie, and LP SmartSide
- Experienced crews who know Michigan-specific installation requirements
- Proper flashing and moisture management
- Building permits and inspections
- Warranty coverage that actually means something
- Insurance and worker's compensation coverage
A well-installed siding job lasts 30-40 years with minimal maintenance. A cheap job might last 5-10 years before major problems appear. The math favors doing it right the first time.
Related Services That Make Sense
When you're already removing siding, several related projects become more cost-effective:
Window replacement: If your windows are 15+ years old, replacing them during siding installation makes sense. The new siding can be properly flashed to the new windows, and you're not paying twice for setup and cleanup. Our Detroit window experts can coordinate this work seamlessly.
Insulation upgrades: With the siding off, adding rigid foam insulation or upgrading wall cavity insulation is straightforward. This is your chance to significantly improve your home's energy efficiency.
Exterior painting: If you have trim, shutters, or other exterior elements that need painting, coordinating this with siding installation makes sense. We're already set up with scaffolding and protection. Our Southeast Michigan painting professionals use Sherwin-Williams products exclusively for long-lasting results.
Ready to Get Started?
NEXT Exteriors has been protecting Michigan homes since 1988. Get a free, no-pressure estimate from a team that shows up on time and does the job right.
Get Your Free QuoteOr call us: (844) 770-6398
Frequently Asked Questions About Siding Installation in Michigan
Properly installed vinyl siding lasts 25-30 years in Michigan. Fiber cement siding like James Hardie can last 40-50 years. Engineered wood typically lasts 25-35 years. The key word is "properly installed" — poor installation can cut these timespans in half. Michigan's freeze-thaw cycles, humidity, and temperature extremes are hard on siding, which is why installation quality matters more here than in milder climates.
Vinyl siding should not be installed when temperatures are below 40°F because the material becomes brittle and can crack. Fiber cement and engineered wood have more temperature flexibility but still have manufacturer limits. We can install siding during Michigan winters on days when temperatures are suitable, but projects often take longer due to weather delays and shorter daylight hours. Late spring through early fall (May-October) is the ideal window for siding installation in Southeast Michigan.
You don't need to be home during installation, but you should be available for the initial walkthrough and the final inspection. We'll need access to exterior electrical outlets and need to discuss where to place dumpsters and equipment. Most homeowners choose to be home the first day and the last day, but it's not required. We'll keep you updated on progress and let you know if any unexpected issues come up that need your input.
Light rain doesn't usually stop work, but we don't install siding during heavy rain because moisture can get trapped behind the house wrap. Your home will be weather-tight every night — we don't leave exposed walls overnight. If rain delays the project, we'll communicate the revised timeline. Spring and fall in Michigan often include rain delays, which is why we build buffer time into project schedules.
Look for these signs of proper installation: house wrap being installed with proper overlap and sealed seams, flashing around every window and door before siding covers it, nails being driven flush but not tight (panels should move slightly), expansion gaps at trim and J-channels, and a building permit posted. Red flags include nails being overdriven, panels forced into place, no visible flashing, or work continuing in freezing temperatures or heavy rain. A professional contractor will welcome your questions and explain what they're doing.
If your windows are 15+ years old or showing signs of failure (drafts, condensation between panes, difficulty opening), replacing them during siding installation makes financial sense. The setup costs are already covered, and the new siding can be properly flashed to new windows for better long-term performance. However, if your windows are newer and performing well, there's no need to replace them just because you're doing siding. A good contractor will give you an honest assessment of your windows' condition and let you decide.
The difference is usually in installation quality and what's included. The lower quote might be skipping house wrap, using minimum-quality materials, not including proper flashing, or planning to work without permits. The higher quote likely includes complete tear-off, sheathing inspection and repair, proper house wrap and flashing, quality materials from manufacturers like CertainTeed or James Hardie, experienced crews, permits and inspections, and comprehensive warranty coverage. In Michigan's climate, proper installation isn't optional — it's the difference between siding that lasts 30 years and siding that fails in 5.